
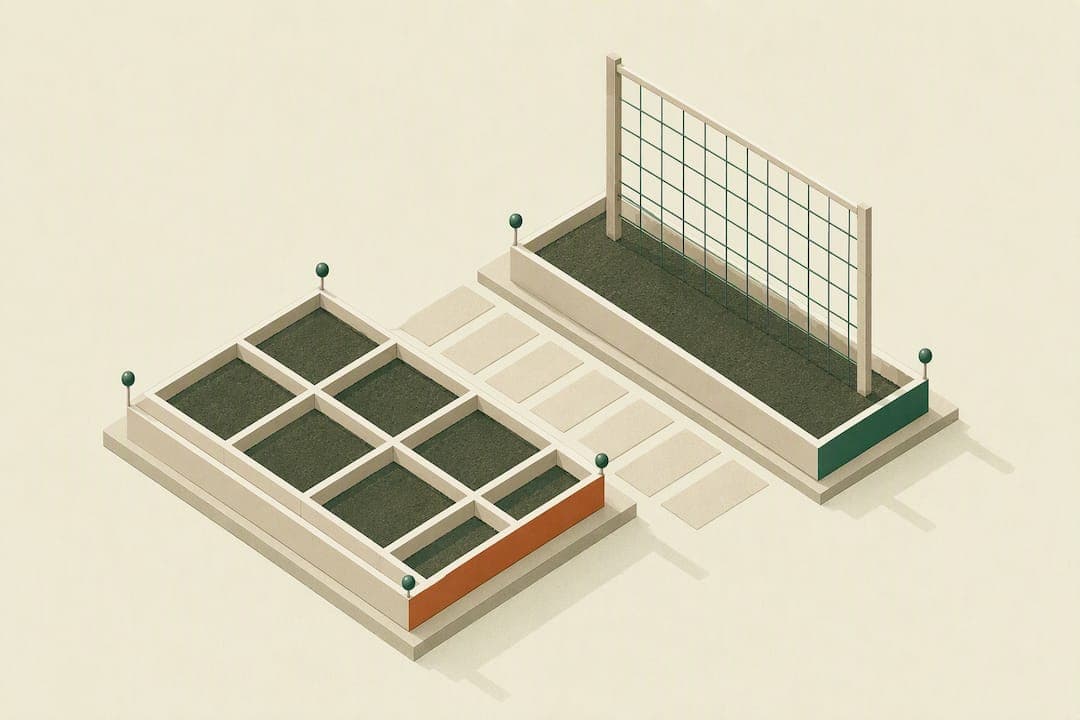
For most home gardeners, the winning raised bed layout uses beds 3 to 4 feet wide when you can reach from both sides, 2 to 2.5 feet when the bed sits against a wall, and 6 to 12 inches deep for most crops (deeper for tomatoes and squash). Leave 18 to 24 inches for foot traffic and a wider path wherever a wheelbarrow needs to pass. Start with a square-foot grid or a 4 by 8 footprint: both are easy to plant, easy to maintain, and forgiving if you change your mind later.
TL;DR:
- Beds wider than 4 feet can cause soil compaction if you need to step into the bed, so maximize reach with 3 to 4 feet for two-sided access.
- Depth should be at least 6 inches for shallow-rooted crops and 12 to 24 inches for deep-rooted plants like tomatoes and squash, especially on hard surfaces.
- Pathways should be at least 18 to 24 inches for foot traffic and 30 to 48 inches for wheelbarrow or wheelchair access to ensure ease of movement and efficiency.
- Layout planning must prioritize accessibility and crop needs, with square-foot grids helping to determine plant density and prevent overcrowding.
- Using 3D planning tools allows precise visualization and cost estimation, helping optimize layout, materials, and integration with existing garden features.
Table of Contents
- Quick planning checklist: what to decide before you draw the layout
- Bed sizes, width, and depth: specific numbers and construction tips
- Paths and spacing between beds: reach, workflows, and layout patterns
- Square-foot layouts: plant-density rules and how to grid your bed
- Practical layout templates: copy-ready 4x8 and other sample plans
- Site selection and orientation: sun, slope, and placing tall or vining crops
- Soil mix, filling, and drainage: recipes, calculations, and special cases
- Irrigation, mulch, and maintenance workflows tied to layout choices
- Companion planting and succession templates that fit layout constraints
- Using a 3D planning tool to visualize, test, and cost a raised bed layout
- Integrating raised beds with existing garden features or landscaping
- Tips for adjusting layouts on uneven or sloped terrain
- What actually matters in a raised bed layout
- Try Veete: start a free raised-bed planning project
- Sources
- FAQ
Quick planning checklist: what to decide before you draw the layout
Before you cut a single board, settle a few basics that shape every other decision. Who is going to tend this bed matters more than most people think: a gardener who needs to sit or use a wheelchair needs narrower beds and taller frames than someone who can bend and reach freely.
Your crop list drives depth and spacing just as much as who's gardening. Leafy greens and herbs are happy in a shallow bed, but tomatoes, peppers, and squash want real root room.
- Decide who gardens here and adjust width and height for comfortable reach.
- List your main crops (vegetables, flowers, or a mix) to set the depth you'll need.
- Plan access for a hose, wheelbarrow, and a nearby water source before you finalize paths.
- Sketch the layout first, either on grid paper or in a 3D planning tool, and confirm the site gets enough sun and drains well.
Bed sizes, width, and depth: specific numbers and construction tips
Width is the number that gets ignored most often, and it's the one that ruins a bed the fastest. A bed wider than 4 feet forces you to step into the soil to reach the middle, which compacts it and undoes the whole point of raised growing. Extension guidance from the University of Georgia recommends 3 to 4 feet for beds you can reach from both sides, 2 to 2.5 feet for beds pushed against a wall or fence, and about 3 feet for beds built for children.

Depth depends on what you're growing and what's underneath. General guidance calls for 6 to 12 inches for most crops, with many vegetable beds landing at 12 to 18 inches, and deep-rooted plants like tomatoes, peppers, and squash doing better at 12 to 24 inches. If the bed sits on concrete, pavers, or any hard surface, go with at least 12 inches because there's no soil below to pull moisture from.
Length is mostly about lumber math. Plan bed lengths in multiples of the boards you're buying (4, 8, or 12 feet) to avoid waste, and add a center support roughly every 4 feet for thinner lumber so the sides don't bow outward once they're full of wet soil.
| Bed feature | Recommended range | Notes |
|---|---|---|
| Width, double-sided access | 3 to 4 ft | Reach from both sides without stepping in |
| Width, single-sided (against wall) | 2 to 2.5 ft | Reach from one side only |
| Width, child-friendly | 3 ft | Easier reach for smaller arms |
| Depth, general crops | 6 to 12 in | Shallow-rooted vegetables and herbs |
| Depth, deep-rooted crops | 12 to 24 in | Tomatoes, peppers, squash |
| Depth, on hard surfaces | 12 in minimum | No soil moisture available from below |
| Walkway, foot traffic | 18 to 24 in | Comfortable walking and kneeling |
| Walkway, wheelbarrow access | 30 to 48 in | Wide enough for wheels and turning |
Lining the interior matters when the ground underneath is questionable. If there's any chance of soil contamination, a permeable barrier between the imported growing medium and the native soil keeps the two separated without blocking drainage.
Paths and spacing between beds: reach, workflows, and layout patterns
Path width is a layout decision, not an afterthought, because it determines how you move, water, and harvest for years. A path that's too narrow turns every wheelbarrow trip into a squeeze; one that's too wide wastes growing space you could have used.
- Foot traffic paths: 18 to 24 inches is enough to walk and kneel comfortably between beds.
- Wheelbarrow or wheelchair paths: 30 to 48 inches gives room to maneuver without clipping the bed edges.
- Parallel rows: suit drip irrigation, since straight lines make it simple to run one supply line down the center path.
- Hub-and-spoke: puts beds around a central hard-surface area, useful when one water spigot or tool shed needs to serve everything.
- Staggered beds: break up a rectangular grid visually and can simplify mowing around the garden's edges.
Wider paths cost you square footage, so if space is tight, reserve the 30-inch-plus paths for the one route you actually need a wheelbarrow to travel and keep the rest at 18 to 24 inches.
Square-foot layouts: plant-density rules and how to grid your bed
A square-foot grid turns a blank bed into a planting map instead of a guessing game. Colorado State Extension's block-style guidance sets plant counts per square foot based on how big each crop grows at maturity, and the same source notes that the most common mistake gardeners make is building beds too wide to reach, which compacts soil and defeats the purpose of raised growing.
Plant-per-square-foot cheat sheet:
- 1 plant per square foot: large crops like tomatoes, peppers, or broccoli that need room to spread.
- 4 plants per square foot: medium crops such as lettuce or Swiss chard.
- 9 plants per square foot: smaller crops like spinach or bush beans.
- 16 plants per square foot: small crops such as radishes or carrots.
Square-foot spacing can meaningfully raise output compared with traditional single-row planting. Colorado State Extension attributes the gain to closer, intentional spacing that fills the bed instead of leaving gaps between rows.
Mark the grid with twine stretched across nailed points, or lay sticks in a simple tic-tac-toe pattern across the bed. Once the grid is up, assign each square to a crop and note what follows it, since dense planting shades out weeds and lets you slot a fast crop like radishes into a square that opens up mid-season.

Practical layout templates: copy-ready 4x8 and other sample plans
These four templates cover the situations most home gardeners run into. Adjust plant counts to your climate and preferred varieties, but the spacing logic holds.
- 4x8 family-supply layout: one tomato per square foot along one long edge (4 squares), 4 pepper plants at 1 per square foot next to them, a 9-square block of bush beans, and the remaining squares split between 4-per-square-foot lettuce and 16-per-square-foot radishes. This mix covers a household's regular vegetable use without overplanting any single crop.
- 4x8 high-yield intensive layout: pack the entire bed at 9 or 16 plants per square foot wherever crop size allows, using spacing guidance such as 3-inch spacing for carrots and radishes, 4-inch spacing for bush beans and spinach, and 6-inch spacing for leaf lettuce. Reserve just one or two squares for a trellised crop like pole beans to keep total yield per square foot as high as possible.
- 4x4 or 3x6 flower and pollinator bed: anchor one corner with a tall flower like a zinnia or cosmos, fill the middle with marigolds and calendula at 4 per square foot, and edge the border with low-growing alyssum. Mixing in a few culinary herbs, such as basil, gives pollinators a longer bloom window and doubles as a companion planting.
- Narrow single-sided bed: for a 2 to 2.5-foot-wide bed against a fence or patio wall, run a trellis along the back edge and plant vining crops like cucumbers or pole beans there, with shorter herbs and lettuce filling the front few inches you can reach easily from one side.
Site selection and orientation: sun, slope, and placing tall or vining crops
Pick a site before you pick a layout, because no amount of clever grid design fixes a shaded, waterlogged spot. University of Minnesota Extension recommends level, well-draining ground that gets 6 to 8 hours of direct sun a day, ideally within an easy walk of a water source.
Once the site is set, orient beds north to south for most vegetable plantings, since this gives each row roughly even light throughout the day as the sun moves overhead. An east to west orientation works when you want it to, mainly to create a deliberate shade screen for cool-season crops planted behind taller ones.
Wherever you place a trellis, put it on the north side or rear edge of the bed so tall or vining crops don't cast shade over shorter plants nearby. Leave enough room behind the trellis for you to reach in and prune or harvest without trampling anything.
Soil mix, filling, and drainage: recipes, calculations, and special cases
The soil you fill a raised bed with matters as much as the frame around it. A common mix blends topsoil for structure, compost for nutrients, and either peat moss, pine bark, or perlite to keep drainage open so roots don't sit in standing water.
Figuring out how much soil to buy is simple math: multiply length by width by depth in feet, then divide by 27 to get cubic yards. UF/IFAS gives a worked example: a 4 by 8 bed filled to about 21.75 inches uses roughly 2.15 cubic yards of soil, a useful reference point for scaling your own bed's dimensions.
- Topsoil provides the bulk and mineral content most plant roots rely on.
- Compost adds organic matter and nutrients that break down over a growing season.
- Perlite or pine bark keeps the mix from compacting and improves drainage.
- Liners belong under beds on ground with contamination concerns, separating imported soil from what's below without blocking water flow.
- Minimum 12 inches of soil is the baseline for any bed sitting on concrete, pavers, or another hard surface.
Irrigation, mulch, and maintenance workflows tied to layout choices
Plan your watering system at the same time as your layout, not after the beds are full of soil. Drip lines and soaker hoses run most efficiently through straight, parallel bed layouts, so decide where hose bibs and access points will sit before you commit to a final arrangement.
UF/IFAS recommends drip or soaker irrigation over overhead watering, run early in the day, with schedules adjusted for young seedlings versus established plants that need less frequent but deeper watering. A simple timer takes the guesswork out of this once the system is installed.
Mulch matters more in dense square-foot plantings, where closely spaced plants shade the soil less on their own early in the season. A couple inches of straw or shredded leaves between seedlings holds moisture and cuts down on the watering frequency you'll need later.
Companion planting and succession templates that fit layout constraints
Group plants by water and light needs rather than by species, and your layout does most of the maintenance work for you. Tall, heavy feeders belong on the north side where they won't shade shorter neighbors, while thirsty leafy greens do best planted near your main irrigation line.
A 4 by 8 bed can carry three plantings in one season: early spring greens like lettuce and spinach, followed by summer tomatoes and peppers once the weather warms, then fall brassicas such as kale or broccoli after the summer crop is cleared. ACES Extension notes that grouping plants with similar water and light needs reduces the maintenance load across a season.
Marigolds and basil are reliable, low-maintenance companions that tuck into corner squares without competing for root space, and both tend to deter common pests when planted near vegetables.
Using a 3D planning tool to visualize, test, and cost a raised bed layout
Paper sketches are fine for a rough idea, but they don't tell you whether a 4-foot-wide bed will actually feel too wide once it's built, or whether a trellis on the north edge will cast shade you didn't expect. A 3D planning tool like Veete lets you test bed widths, path spacing, and trellis placement visually before any lumber gets cut, so you catch reach and shading problems on screen instead of after the soil is in.
The bigger advantage shows up in the budget. Because some 3D planning tools link live pricing directly to every object in the design, moving a bed from 4 feet to 3 feet wide, or adding a second path, can update the materials list and cost estimate automatically instead of leaving you to re-measure and recalculate by hand.
Pro Tip: Build your 4x8 template in a 3D planner first, then adjust one variable at a time (width, path spacing, trellis position) to see the cost and layout impact before you commit to real materials.
Integrating raised beds with existing garden features or landscaping
Raised beds rarely sit in isolation, and the best layouts treat existing features as fixed points to design around rather than obstacles to remove. A mature tree's root zone and shade pattern should push beds outward to keep them in full sun, while a fence line or patio edge often becomes the natural back wall for a single-sided bed with a trellis.
Existing pathways matter too. If a lawn already has a mowing strip or a gravel walkway running through the yard, aligning new beds parallel to it keeps the whole space easier to maintain and avoids awkward mowing angles around bed corners.
Beds near a patio or deck benefit from matching materials, since a cedar bed next to a cedar deck reads as one connected space rather than two unrelated projects. Where a raised bed sits close to an ornamental garden, keep a consistent path width between the two areas so the whole yard feels like one design instead of a vegetable patch bolted onto a flower garden.
Utility features like a rain barrel, compost bin, or garden shed should factor into the layout early, since placing beds within a short hose reach of a water source or compost pile saves repeated trips every time you water or amend soil.
Tips for adjusting layouts on uneven or sloped terrain
A sloped yard doesn't rule out raised beds, but it does change how you build and orient them. On a gentle slope, orient the long side of each bed across the slope rather than running it up and down, which keeps the bed itself level even if the ground underneath isn't.
For steeper grades, terracing works better than trying to force one long bed to sit flat. Building a series of shorter beds stepped down the slope, each with its own level footing, avoids the uneven soil settling and water pooling that happens when one side of a bed sits higher than the other.

Water runoff becomes a bigger factor on a slope, since heavy rain can wash soil and mulch downhill out of an unprotected bed. Keeping bed frames a few inches taller on the downhill side, or adding a small gravel-filled trench along the low edge, helps redirect that runoff away from the growing area.
Access paths on a slope need a slightly different width rule than flat ground. Add a few inches to the standard 18 to 24 inch walking path on a sloped site, since footing is less secure and a narrower path feels tighter when you're also managing an incline.
What actually matters in a raised bed layout
Most raised bed advice spends too much time on aesthetics, curved edges, decorative timber, matching colors, and not enough on the two numbers that decide whether a bed works: width and path clearance. A gorgeous layout you can't reach into without stepping on the soil is a maintenance problem for the next ten years.
The square-foot method gets treated as an optional upgrade when it should be the default starting point for anyone without a huge yard. It forces you to think in plant counts per square foot instead of vague rows, and that discipline is what actually prevents overcrowding and wasted seed.
If you take one thing from this guide, prioritize reach and path width before you think about crop selection or bed shape. Everything else, soil mix, irrigation, companion pairings, is easy to adjust after the fact. A bed built too wide to weed comfortably is not.
— Rokas
Try Veete: start a free raised-bed planning project
Sketching a layout on paper only tells you so much: it won't show you whether a 3-foot path actually clears your wheelbarrow, or what a 4x8 bed with a trellis will cost once you add soil, lumber, and irrigation. Some free 3D planning tools let you draw a bed layout in 3D, test widths and path spacing against your real yard dimensions, and see live pricing update as you adjust the design, no card required to start.
Try building one of the 4x8 templates from this guide inside Veete, then export the plant layout and materials list before you buy anything. Check the Veete pricing page for the Home and Pro plans if you want to manage multiple garden projects beyond the free tier.
Sources
- Raised garden beds dimensions (University of Georgia extension)
- Block-style layout in raised bed vegetable gardens (Colorado State Extension)
- Raised bed gardens (University of Minnesota Extension)
- Gardening in raised beds (UF/IFAS)
FAQ
What is the best layout for raised garden beds?
A 3 to 4-foot-wide bed you can reach from both sides, paired with an 18 to 24 inch walking path, works for most home gardens. Square-foot grids inside that footprint make planting and succession easier to track, as recommended by Colorado State Extension.
What is the 70/30 rule in gardening?
This isn't a standard rule found in university extension guidance on raised bed layout, and definitions vary depending on where you encounter it. If you've seen it referenced elsewhere, treat it as informal advice rather than an established horticultural standard.
What is the recommended spacing between raised beds?
Leave 18 to 24 inches between beds for comfortable foot traffic and kneeling, and widen that to 30 to 48 inches on any path a wheelbarrow needs to travel, per UF/IFAS guidance. Choose the wider spacing for at least one main path even if the rest of the garden uses the narrower measurement.
What are some good ways to layout a 4x8 raised bed garden?
Split a 4x8 bed into a square-foot grid and assign crops by their mature size: 1 tomato plant per square foot along one edge, 4 lettuce plants per square foot in a middle block, and 16 radishes per square foot in the remaining corners. A tool like Veete can turn this grid into a visual plan with a matching materials list before you build anything.