
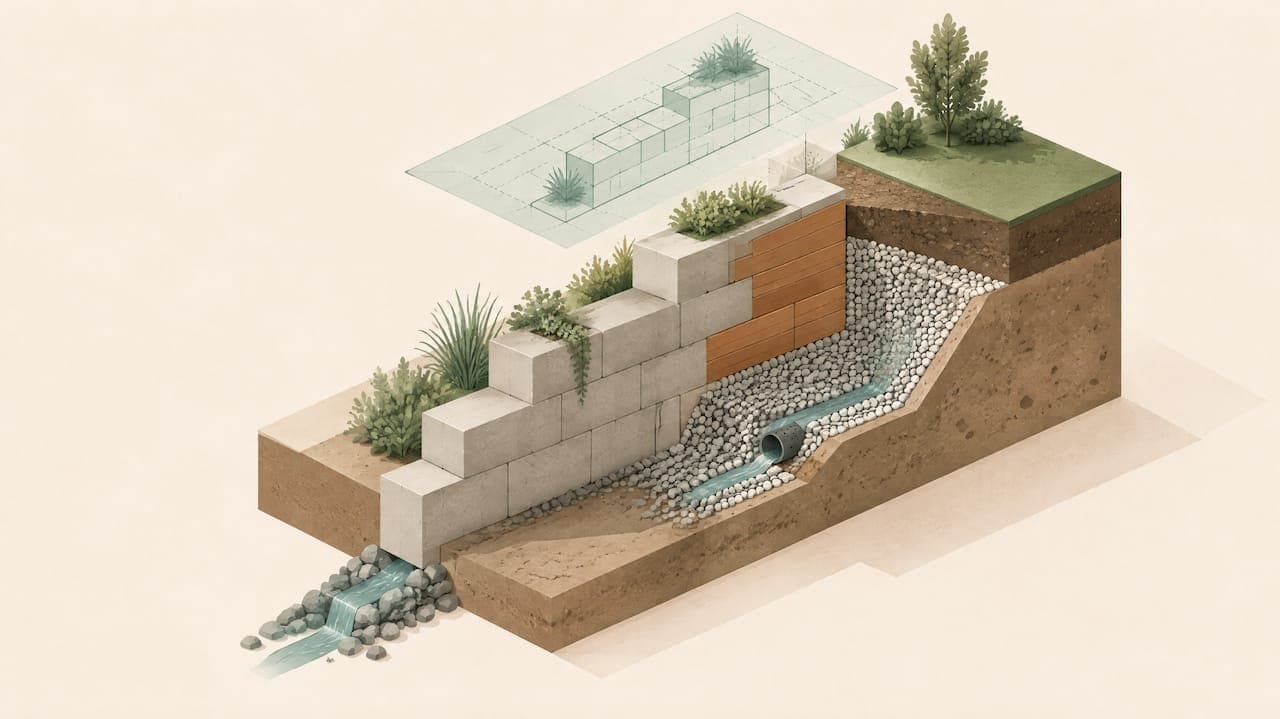
A correct retaining wall design resists the lateral push of soil and water, manages drainage so pressure never builds up behind the wall, and rests on a foundation sized for the actual soil conditions on site. Get those three things right and most failures never happen. Skip the geotechnical investigation or the drainage plan, and even a well-built wall can fail within a few seasons. Walls taller than about 4 feet, or any wall near a structure, slope, or surcharge load, call for a licensed engineer.
TL;DR:
- Proper retaining wall design requires addressing lateral soil and water pressure, drainage management, and a foundation suitable for site soil conditions.
- Walls taller than about 4 feet or near structures must be designed or reviewed by a licensed engineer, especially when surcharge loads or slope stability are involved.
- Drainage systems should include drain rock, geotextile fabric, perforated pipes, and outlets to prevent hydrostatic pressure buildup and failure.
- Soil testing, including friction angle, groundwater depth, and bearing capacity, is critical; skipping it risks structural failure and should prompt engineering review.
- Using a 3D planning tool can streamline design, material estimation, and communication with contractors, especially for complex or larger projects.
Table of Contents
- Types of retaining walls and when to choose each
- Site and geotechnical evaluation: tests to get and red flags
- Design overview: step-by-step checklist and key calculations
- Drainage, backfill, and material selection (the non-negotiables)
- Construction sequencing and common mistakes to avoid
- Maintenance and inspection: what to check and when to call a professional
- How a 3D planning tool helps with design handoff
- Detailed structural design calculations: reinforcement and footing sizing
- Permits, regulations, and when to bring in an engineer
- Environmental impact and sustainable design options
- Integrating retaining walls into landscaping and aesthetic design
- Retaining walls in different climates and adaptation strategies
- Author perspective: why soil and drainage decide everything
- Plan your wall in 3D before you build it
- FAQ
- Sources
Types of retaining walls and when to choose each
The right wall type depends on height, soil, and what sits behind it. Gravity walls rely on their own mass to resist overturning and work well for short garden walls. Segmental or modular block systems are the most common residential choice because they stack without mortar and drain easily between units. Cantilever walls use a reinforced concrete footing and stem to resist much taller loads with less material volume. Anchored or soil-nail walls tie back into stable soil or rock, useful where space behind the wall is limited. Mechanically stabilized earth (MSE) walls use geogrid layers woven into the backfill, and FHWA guidance notes they perform like gravity walls while tolerating more settlement, making them a practical choice for taller or commercial applications. Gabion walls (stone-filled wire baskets) suit drainage-heavy or rustic sites. Timber walls are inexpensive but decay over time and are a poor choice near moisture.
- Gravity and segmental block walls commonly stay safe up to roughly 3.5 to 4 feet before reinforcement becomes necessary.
- Geogrid-reinforced and MSE systems extend well beyond that height and support tiered or terraced designs.
- Timber looks natural but has the shortest service life of any common material.
Aesthetics matter, but a beautiful wall that lacks structural reinforcement for its height is not a design choice, it is a liability.
Site and geotechnical evaluation: tests to get and red flags
Soil is the single biggest variable in retaining wall design, and it is also the one homeowner's most often skip. A geotechnical report typically includes a boring log with standard penetration test (SPT) values, the depth to groundwater, in-situ soil density, the internal friction angle, and the allowable bearing capacity of the foundation soil.
- Friction angle and density determine the lateral earth pressure the wall must resist.
- Groundwater depth affects both pressure and the drainage system's design, since saturated backfill can roughly double lateral earth pressure compared to dry soil.
- Bearing capacity sets how wide the footing needs to be to avoid settlement.
- SPT blow counts flag loose or soft layers that may need over-excavation.
Red flags that warrant an engineer regardless of wall height include organic or peaty soil, visible springs or seepage on the slope, cracks in nearby structures, or a wall built close to a property line or existing foundation.
Pro Tip: If you see standing water or lush vegetation at the base of a slope you plan to retain, assume a high water table and budget for a more robust drainage system before finalizing the design.
Design overview: step-by-step checklist and key calculations
A sound design process follows a consistent order, whether a homeowner is sketching a garden wall or an engineer is stamping drawings for a commercial project.
- Define the wall's purpose, height, and length, and survey the slope and any nearby structures.
- Collect soil data: friction angle, density, groundwater depth, bearing capacity.
- Calculate lateral earth pressure (active pressure under normal conditions, passive pressure where resistance is needed) using the soil parameters.
- Add surcharge loads (patios, driveways, structures above the wall) and seismic loads where relevant.
- Check sliding, overturning, and bearing stability against required factors of safety.
- Size the footing, reinforcement, and embedment depth.
- Finalize the drainage layout and outlet location.
- Produce drawings and, for engineered walls, obtain a stamped calculation package.
A properly designed wall typically targets a sliding factor of safety near 1.5, an overturning factor near 2.0, and a bearing factor near 3.0, though exact values vary by local code and soil conditions.
Design software can handle these calculations for straightforward walls under the height thresholds where engineering review is optional. Anything taller, tiered, or carrying a surcharge should go through a licensed engineer who can account for seismic loads, overall slope stability, and local code variations that generic software will not catch.
Drainage, backfill, and material selection (the non-negotiables)
Water, not soil, causes most retaining wall failures. A functioning drainage assembly needs several components working together, and skipping any one of them undermines the rest.
- A continuous column of washed, angular drain rock 12 to 18 inches deep behind the wall face.
- Non-woven geotextile fabric separating the drain rock from native soil to prevent clogging.
- A 4-inch perforated pipe at the base of the drain rock, sloped at a minimum of 1%, carrying water to a safe outlet.
- Weep holes or daylighted outlets so water never pools behind the structure.
Omitting any single element can let hydrostatic pressure build to three to four times normal levels, which is the leading cause of bulging and collapse.
Backfill should be free-draining granular material, compacted in lifts rather than dumped and left loose, with geotextile separating it from finer native soil to keep the system draining long term. For materials, modular blocks are durable and forgiving of minor settlement; poured concrete offers the highest strength per inch but needs formwork and cure time; natural stone is attractive and long-lived but labor-intensive; gabions handle drainage and movement well on unstable sites; timber is the cheapest option but rots and should be reserved for walls under a few years of expected service life.
Construction sequencing and common mistakes to avoid
Build order matters as much as the design itself. Excavate and remove organic topsoil first, then compact a leveling pad of crushed stone for the footing. Install drainage components before backfilling, not after, since retrofitting drainage behind a finished wall is far more expensive than building it in from the start. Backfill and compact in shallow lifts, checking each layer before adding the next.
- Skipping drainage entirely is the single most common and most damaging mistake.
- Under-compacting backfill leads to settlement cracks within a year or two.
- Exceeding a block system's rated height without adding reinforcement invites bulging.
- Skipping inspections on engineered walls can void warranties and miss code violations.
Pro Tip: Compact backfill in lifts no thicker than 8 to 12 inches; thicker lifts look faster but rarely compact evenly all the way through.
Maintenance and inspection: what to check and when to call a professional
Walk the wall once a year and check for cracking, bowing, or any section leaning out of plane, along with standing water near the base, which signals a clogged or failed drain. Clear debris from weep holes and outlets, and keep woody vegetation roots away from the structure.

Minor hairline cracks and efflorescence are usually cosmetic. Bowing, a lean of more than an inch or two over a few feet of height, or sudden new cracks mean it is time to call an engineer. Active movement, soil loss behind the wall, or saturated backfill after heavy rain are signs that call for immediate professional attention rather than a wait-and-see approach.
How a 3D planning tool helps with design handoff
Translating a retaining wall concept into numbers an engineer or contractor can use is where many projects stall. A 3D planning tool lets you lay out wall height, length, and grade changes visually, with quantities and costs updating as the geometry changes.
- Linked pricing means a height change updates block count, drain rock volume, and cost at once.
- 3D layout makes drainage routing and access paths easier to see before excavation starts.
- Exportable plans give contractors or engineers a scaled drawing, cross-sections, and material quantities in one document instead of scattered notes.
That kind of documentation shortens the back-and-forth before work begins.
Detailed structural design calculations: reinforcement and footing sizing
For engineered walls, two calculations carry the most weight: reinforcement design and footing sizing. Reinforcement design starts with the bending moment created by lateral earth pressure acting on the stem, then sizes vertical steel in a cantilever wall (or geogrid layer spacing in an MSE wall) to resist that moment with an adequate margin. Horizontal reinforcement controls shrinkage cracking and ties the wall together across its length.
Footing sizing works from the bearing pressure the foundation soil can safely carry. The footing width must spread the wall's weight, the soil's weight above the heel, and any surcharge load thinly enough that the resulting pressure stays under the soil's allowable bearing capacity, with margin for eccentric loading when the wall tips slightly under lateral pressure. A heel that is too narrow concentrates pressure on the toe and invites rotation; a footing that is too shallow risks frost heave in cold climates or scour near water.
Embedment depth, how far the footing sits below the lowest point of exposed grade, matters just as much as width. Shallow embedment leaves the toe exposed to erosion or frost, while adequate depth anchors the wall against sliding and gives passive soil resistance in front of the footing. These calculations are straightforward in principle but sensitive to the soil data gathered in the geotechnical phase, which is why reinforcement and footing numbers from a template rarely transfer safely from one site to another. A stamped calculation package from a structural or geotechnical engineer remains the standard for any wall where failure would be costly or dangerous.

Permits, regulations, and when to bring in an engineer
Permit rules for retaining walls vary widely by jurisdiction, so check with your local building department before starting excavation. Many regions set a height threshold, often somewhere between roughly 3 and 4 feet, above which engineered drawings or a geotechnical report become mandatory, and some local authorities also require review when a wall sits near a property line, a public right-of-way, or buried utilities.
Manufacturer guidelines for modular block systems often cap unreinforced use at under 4 feet with no surcharge load, which lines up closely with typical permit thresholds. If your wall exceeds that height, supports a driveway or patio above it, sits within a few feet of a structure, or retains a slope with any history of movement, bring in a licensed engineer regardless of what the local permit desk requires. A stamped design also protects you if a neighboring property is affected or if the wall needs to be sold or refinanced against later.
A simple checklist before breaking ground: confirm the height threshold that triggers engineering review in your area, check setback requirements from property lines, verify whether utility locates are required, and ask whether drainage discharge needs a separate approval if it crosses onto another property or into a stormwater system.
Environmental impact and sustainable design options
Retaining walls affect more than the slope they hold back. Concrete production carries a meaningful carbon footprint, and large graded sites can increase runoff if drainage is not planned to match natural flow patterns. A few choices reduce that impact without compromising performance. Gabion walls use stone fill, often locally sourced, and need less cement than poured concrete equivalents. Permeable segmental block systems let some water pass through the structure itself, reducing the load on engineered drains. Reclaimed stone or timber, where structurally appropriate, cuts down on new material production.
Planting the top and face of a wall, where the design allows it, reduces surface runoff and helps blend the structure into the surrounding landscape. Directing drainage outlets into a rain garden or vegetated swale instead of a storm drain keeps water on site longer and reduces erosion downstream. None of these choices change the structural requirements covered earlier: drainage, soil checks, and factors of safety still apply in full. Sustainable design here means choosing the lowest-impact materials and water strategy that still meet those requirements, not cutting corners on them.
Integrating retaining walls into landscaping and aesthetic design
A retaining wall is almost never just a structural element. It usually doubles as a planting bed edge, a seating wall, a terrace divider, or the backbone of a tiered garden. Designing for that dual purpose from the start avoids awkward retrofits later.
Material choice carries aesthetic weight: natural stone and textured modular block tend to read as more natural in garden settings, while poured concrete can be finished smooth for a more architectural look or stamped and colored to mimic stone. Height and setback also shape how usable the space in front of and behind the wall feels, a wall capped wide enough to sit on adds function without extra cost. Tiered walls, stepped back from each other with planting beds in between, spread out the total height into shorter, less visually dominant segments while also reducing the lateral load on any single wall.
Lighting integrated into the wall face or cap, and plant selection suited to the microclimate a wall creates (drier and warmer on a south-facing stone wall, cooler and shadier behind it), both turn a structural necessity into a landscaping feature. The key constraint is that none of these choices should compromise the drainage or reinforcement the structure needs: a planting pocket cut into a reinforced zone, for instance, can weaken the wall if not planned around the engineering.
Retaining walls in different climates and adaptation strategies
Climate changes which failure mode you are designing against most. In freeze-thaw regions, frost heave can push against a wall from behind or lift a shallow footing, so footings need to sit below the local frost line, and backfill needs reliable drainage to keep water from freezing in place against the wall. In high-rainfall or monsoonal climates, drainage capacity matters more than in dry regions. Oversized drain pipe and more frequent weep holes reduce the risk of the saturated backfill conditions that roughly double lateral pressure.
In arid or semi-arid climates, flash flooding after rare storms can overwhelm a drainage system sized only for typical conditions, so outlets and pipe sizing should account for peak events rather than average rainfall. Coastal and high-water-table sites need corrosion-resistant reinforcement (galvanized or composite rather than bare steel) and drainage designed around a permanently elevated groundwater level rather than occasional saturation. In seismic regions, design also needs to account for dynamic lateral forces during an earthquake, which is one of the extreme-event checks FHWA guidance requires alongside the standard service and strength checks.
No single wall design works everywhere, the same block system that performs well in a dry inland climate may need a completely different drainage and reinforcement strategy on a wet coastal slope.
Author perspective: why soil and drainage decide everything
Most retaining wall failures trace back to skipped soil testing or missing drainage, not bad math. Get those two right first, choose your materials second, and bring in an engineer the moment height or surcharge pushes past DIY territory.
— Rokas
Plan your wall in 3D before you build it
Turning a retaining wall sketch into a buildable plan gets easier when the geometry and the cost update together. We built Veete as a browser-based 3D planning tool where you lay out wall height, length, and grading, and every material quantity and itemized cost adjusts automatically as you adjust the design.

- Live, linked pricing means changing wall height updates block count, drain rock volume, and total cost at once.
- Exportable plans give you a scaled layout and quantities to hand straight to a contractor or engineer.
- No installation or card required to start on the free plan.
For bigger projects with ongoing cost tracking across multiple designs, our Home and Pro plans add expanded project limits and export features. Start with the free plan to sketch your wall, or check current pricing on the pricing page to see which tier fits your project.
FAQ
Are retaining walls expensive to build?
Cost depends heavily on wall height, material, and whether engineering or permits are required, with poured concrete and engineered systems typically costing more than modular block or timber. Drainage materials and excavation often add as much to the budget as the visible wall face itself.
What is the 1/3 rule for retaining walls?
The "1/3 rule" is a rough rule of thumb some builders use for gravity wall base width, sizing the footing or base at roughly one-third of the wall's exposed height. It is a starting estimate only, actual sizing depends on soil friction angle, surcharge, and the stability checks covered in the design steps above, so confirm with calculations or an engineer for anything beyond a short garden wall.
What are common retaining wall mistakes?
The most frequent and damaging mistake is skipping or under-building the drainage system, which lets hydrostatic pressure build up behind the wall. Poor backfill compaction, ignoring a block system's rated height limit, and skipping soil testing before design round out the most common errors.
Does a 4 ft retaining wall need drainage?
Yes, drainage is necessary at virtually any wall height because water pressure, not just soil weight, drives most failures. A 4-foot wall still needs drain rock, a perforated pipe or weep holes, and a geotextile separator behind it to stay stable long term.
Sources
- Retaining wall drainage design
- Understanding retaining wall systems and when to use each
- GEC 11 Design and Construction of Mechanically Stabilized Earth Walls and Reinforced Soil Slopes
- Earth Retaining Systems — Caltrans bridge design practices (chapter excerpt)