
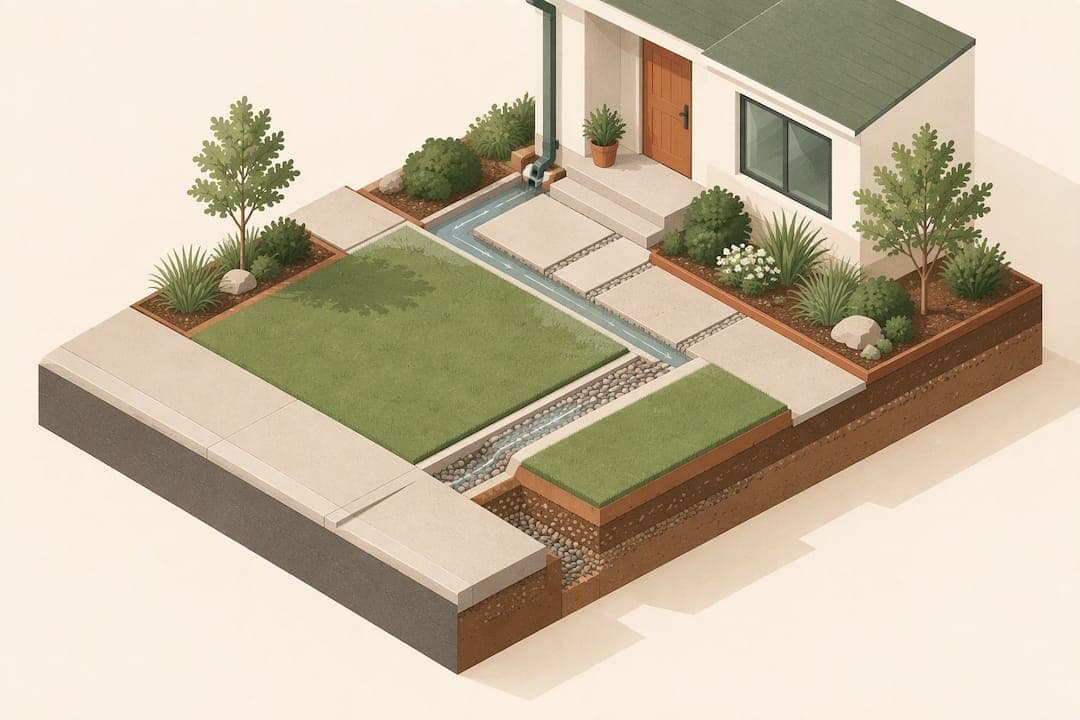
The most effective front yard landscaping plan fixes grade and drainage first, defines a welcoming entry, replaces bare mulch with layered plantings, and adds a hardscape anchor before any lighting or finishing touches. Get this order right and you end up with curb appeal that holds up over time, a yard that's easier to maintain, and a budget you can spend in phases instead of all at once.
TL;DR:
- Draw a scaled site plan, using 1 inch for every 10 feet on a typical lot, and record sun, soil, drainage, utilities, and sightlines.
- Where space allows, make beds at least 5 to 6 feet deep and layer plants by mature size, from tallest to shortest.
- Phase spending by correcting drainage and grading first, installing hardscape next, adding trees and shrubs afterward, and filling beds with perennials as funds allow.
- Test soil drainage before sizing a rain garden, keep it away from foundations and septic systems, and plan overflow for both wet and dry zones.
Table of Contents
- Front yard ideas and design patterns worth adapting
- How to build your base plan, site inventory, and phasing
- Planting and bed design: layering, plant selection, and natives
- Hardscaping, walkways, and matching your home's architecture
- Lighting and finishing touches for evening curb appeal
- Stormwater basics and rain garden siting for a front yard
- Budgeting and low-cost tactics: phasing, DIY, and timing
- 2026 trends and the mistakes that date a front yard fast
- Turning your plan into a costed project with Veete
- Why I push homeowners toward a plan-first approach
- Start designing your front yard plan with Veete
- FAQ
- Sources
Front yard ideas and design patterns worth adapting
A handful of design moves show up again and again in front yards that actually work, regardless of lot size or budget. The common thread is scale: bigger, simpler gestures tend to read better than scattered small ones.
- Extend beds toward the street instead of hugging the foundation; wider, deeper beds anchor the house to the lot rather than looking like a narrow collar around it.
- Layer plantings from back to front: small trees or large shrubs first, then mid-size shrubs, then perennials, then a groundcover edge.
- Define an entry path that connects clearly from the sidewalk or driveway to the front door, wide enough to feel like an invitation rather than an afterthought.
- Shrink the lawn where it isn't doing real work, replacing turf with a mixed bed or a low-water native planting.
- Choose one or two large, well-made containers instead of a cluster of small mismatched pots.
None of these require a full yard overhaul to start. A homeowner with a flat, blank front lawn can pull off the same look as a hillside property by scaling the anchor bed and path to the lot. Landscape designers point out that beds extending out from the foundation, rather than narrow strips hugging it, are what makes a front yard read as intentional in 2026 rather than dated. The goal isn't to fill every inch. It's to pick two or three of these moves and execute them well, which usually looks more finished than a yard with a little bit of everything.
How to build your base plan, site inventory, and phasing
A plan that works on paper starts with accurate measurements, not inspiration photos. Professional designers follow a consistent sequence: inventory the site, analyze it, sketch functional zones, then detail a final design.
- Draw a base plan to scale. Use 1 inch equals 10 feet for a typical residential lot, or a 1/4 inch scale for a small courtyard, a convention that professional landscape designers rely on to avoid sizing mistakes once construction starts.
- Walk the site and note everything. Record sun and shade patterns through the day, soil type, drainage flow, existing trees, sightlines from the street, setback lines, and utility locations.
- Sketch bubble diagrams. Turn your wish list (more color, a path, less mowing) into rough circles representing zones, then refine them into real shapes once they overlap sensibly.
- Prioritize permanent elements first. Grading, drainage corrections, and hardscape go in before a single plant, since redoing them later means tearing out beds you just installed.
- Use simple field tools. Lay a garden hose on the ground to test bed shapes before digging, and triangulate from two fixed points, like porch corners, to mark where existing trees or features sit on your base plan.
Pro Tip: Photocopy your base plan a few times before you start sketching ideas on it, so a messy first draft doesn't force you to remeasure the whole yard.
Planting and bed design: layering, plant selection, and natives
A bed that looks professionally designed usually comes down to depth and layering, not exotic plant choices. Shallow beds against the foundation rarely have room for more than one row of shrubs, which is why they tend to look thin within a few years.
- Aim for at least 5 to 6 feet of bed depth wherever space allows, enough room to stack a small tree or large shrub, mid-size shrubs, perennials, and a groundcover edge.
- Match plants to microclimate, not just style: full sun, part shade, and wet or dry soil each call for a different plant list.
- Favor native species where they fit the look you want, since established natives typically need less irrigation than non-native ornamentals once they're rooted in.
- Draw every plant at its mature size on your base plan, not its nursery pot size, so a shrub that reaches 6 feet wide doesn't end up crowding its neighbors or needing constant pruning.
This last step is the one most homeowners skip, and it's the reason so many foundation beds look overgrown within five years. A 2-gallon shrub looks lonely on paper at mature spacing, but that gap fills in fast once it's actually growing.
Hardscaping, walkways, and matching your home's architecture
Hardscape goes in before planting for a practical reason: grading and digging around new beds damages them. Decide your walkways and entry definition first, then build beds around what's already in the ground.
- Size the main walkway generously. A path that feels welcoming, rather than purely functional, usually needs more width than a narrow utility walk.
- Connect the front door to the street directly, avoiding awkward doglegs unless there's a real reason, like routing around an existing tree.
- Match materials to the house. A brick colonial and a modern stucco home call for different paving, edging, and wall materials to look intentional rather than mismatched.
- Install grade changes and hard surfaces before planting, since redoing a retaining wall after beds are in means replanting everything around it.
Lighting and finishing touches for evening curb appeal
A front yard that looks great at 2 p.m. but disappears at night is only half finished. Lighting and small details often matter more than another round of plants.
- Place path lights at ankle height, spaced to guide the eye rather than floodlighting the whole walk.
- Uplight one or two feature plants or architectural elements instead of lighting everything equally.
- Choose low-voltage wiring for reliability, or solar fixtures where running a line isn't practical, accepting that solar output varies with season and sun exposure.
- Swap tiny glossy pots for one or two larger, earthier containers, and refresh house numbers, the mailbox, and mulch color for an easy, low-cost update.
Stormwater basics and rain garden siting for a front yard
A rain garden can solve a drainage problem and double as a planted feature, but siting it wrong creates new problems. Keep it a safe distance from your foundation and any septic system, and never place it in a low spot that already ponds against the house.
- Size and depth depend on soil. Sandy soil typically allows a deeper basin, while clay soil needs a shallower one to drain within a reasonable window, with properly sized gardens commonly running in a wide range depending on the drainage area.
- Test your soil's drainage rate before finalizing size, since a slow-draining site needs a different design than a fast-draining one.
- Plan the overflow path and plant palette together, choosing plants suited to the ponding zone versus the drier edges to reduce long-term irrigation and prevent erosion at the outlet.
For homeowners who want help working through the sizing math, our guide to rain garden design and pricing walks through siting and planting choices in more detail.
Budgeting and low-cost tactics: phasing, DIY, and timing
Spend money in the order that protects your investment. Fix drainage and grade first, then install hardscape, then structural trees and shrubs, then fill in with perennials and containers as budget allows.
- Reuse what's usable, like existing edging, pavers, or healthy mature shrubs, before buying new material.
- Buy smaller plant stock where you can wait for it to fill in, since a 1-gallon shrub costs a fraction of a 5-gallon one.
- DIY the planting, hire out structural work like grading, retaining walls, or drainage, where mistakes are expensive to fix.
- Plant large trees early in the phasing schedule, since they take the longest to establish and deliver their biggest payoff years down the line.
Our breakdown of low maintenance landscaping strategies covers more ways to stretch a tight budget without sacrificing the finished look.
2026 trends and the mistakes that date a front yard fast
The direction for 2026 favors restraint: larger, layered beds that anchor the house, plants doing the visual work instead of acres of mulch, and materials that actually match the architecture.
- Avoid oversized foundation shrubs that eventually swallow windows and porches.
- Skip narrow "mustache" beds that hug the foundation in a thin strip.
- Replace small mismatched pots with one or two larger, cohesive containers.
- Drop bright dyed mulch in favor of natural brown or shredded hardwood.
- Match hardscape materials to your home instead of mixing styles that fight each other, a shift landscape designers specifically flag as separating updated yards from dated ones.
Turning your plan into a costed project with Veete
Once you have a base plan and a phasing order, the next challenge is pricing it accurately without re-measuring every time you change your mind. We built Veete to solve exactly that.
- Every bed, path, and structure you draw in 3D carries live pricing, so adjusting a bed shape updates quantities and costs automatically instead of leaving you with stale estimates.
- Itemized plans support phasing, letting you cost out year one hardscape separately from year two planting.
- Exportable plans and shopping lists make it straightforward to hand a finished design to a contractor or shop the materials yourself.
Why I push homeowners toward a plan-first approach
I've seen the same pattern play out over and over: homeowners buy plants first and figure out placement later, then spend years fighting overcrowding and awkward sightlines they could have avoided with an hour of measuring. A plan drawn before you dig costs nothing and saves real money.
— Rokas
Start designing your front yard plan with Veete
Homeowners can map out beds, paths, and structures in 3D using our free plan, with no card required to start a project.
Upgrading to Home or Pro adds multiple projects, exportable plans, and shopping lists, useful once you're ready to phase the work or hand a plan to a contractor. Start a layout at Veete and see live costs update as you adjust your design.
FAQ
What is the 3-5-7 rule in landscaping?
The 3-5-7 rule is a common design guideline suggesting plants, beds, or groupings work best in odd numbers, like groups of 3, 5, or 7, since odd groupings tend to look more natural than even ones. It's a rule of thumb rather than a strict standard, and many designers adapt it based on plant size and bed scale.
How do I design my front yard landscape?
Start with a scaled base plan and a full site inventory covering sun, shade, soil, drainage, and existing features, a sequence professional designers follow before sketching zones. From there, prioritize grading and hardscape, then layer plantings from tall to short, and finish with lighting and containers.
What are the trends in front yard landscaping for 2026?
For 2026, designers favor larger, layered beds that anchor the house to the lot, plants providing visual interest instead of large mulch expanses, and hardscape materials chosen to match the home's architecture. Features flagged as dated include oversized foundation shrubs, narrow foundation beds, and bright dyed mulch.
What is the cheapest way to landscape my front yard?
The lowest-cost approach phases the work: fix drainage and grade first since that's the hardest to redo later, then install any hardscape, then add structural trees and shrubs, and fill in perennials and containers as budget allows. Buying smaller plant stock and reusing existing materials where possible also keeps early costs down.
Sources
- ENH1112/EP375: Landscape Design: Ten Important Things to Consider
- Landscape designers say these 7 things will date your home in 2026 | Homes & Gardens