
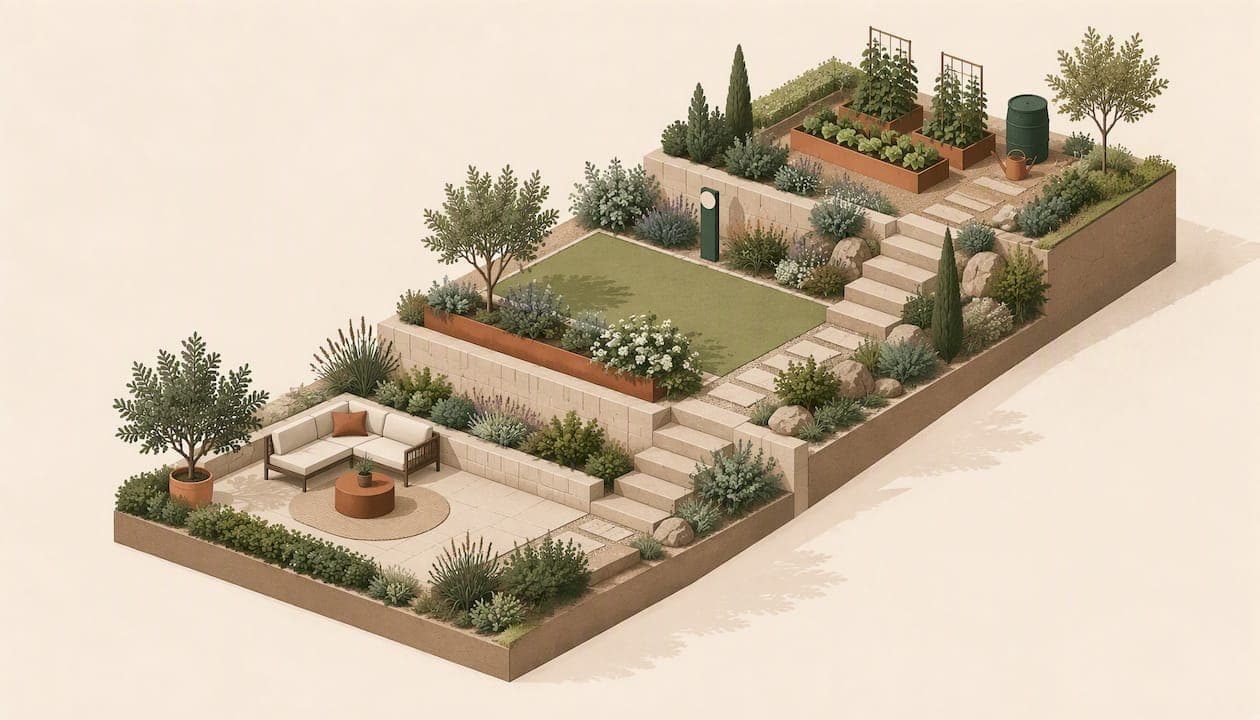
A good sloped yard design starts with three things: the measured grade, a zoning plan that decides where each activity goes, and a budget for the hard parts (walls, steps and drainage) before you pick a single plant. Do those in that order and the slope stops being a problem. It becomes the reason the yard has levels, views and character.
This guide walks through how to read your slope, how to zone it, when to terrace and when to bank a border instead, what walls, paths and steps need to be safe, and how to keep the cost from drifting as the plan changes.
TL;DR
- Measure first: slope percent is rise divided by run, times 100. Anything above 20% counts as steep and needs more serious erosion and wall planning.
- Settle the zones (lawn, terrace, planting, access) before you place any object. A pretty layout that ignores how you walk and haul things fails within a season.
- Terraces turn one steep face into usable flat platforms, but every wall needs drainage behind it. Skipping that is the costliest shortcut in the plan.
- Budget walls by square foot of face, add access premiums for tight sites, and re-price whenever the design changes.
Table of Contents
- Start by measuring the slope
- Zone the yard before you decorate it
- Terraces, banked borders or a mix
- Retaining walls: height, shape and drainage
- Paths, steps and safe routes
- Planting a slope for roots, not only looks
- What a sloped yard costs
- Our perspective
- Plan and price your slope in 3D
- A step-by-step workflow for your slope
- FAQ
- Sources
Start by measuring the slope
Before you sketch, find out how steep the yard really is. Extension guidance defines a steep slope as land rising more than 20% in angle, which works out to 2 feet of elevation change for every 10 feet of horizontal distance.
The formula is simple: rise divided by run, multiplied by 100. A yard that drops 8 feet over 40 feet of run is a 20% grade. One that drops 4 feet over 40 feet is 10%, a gentle slope you can often handle with beds, steps and a few low walls.
Why the threshold matters: UGA Extension notes that slope planning adds erosion and stormwater dynamics on top of the usual soil, sun, drainage and irrigation questions. Below 20%, most homeowners can plan with confidence. Above it, bring in a landscape professional or engineer for the structural parts.
How to take the measurements
- Pick the line you care about, for example from the back door to the fence.
- Drive a stake at the top and the bottom and run a string level between them.
- Measure the height from the string to the ground at the lower stake. That is your rise.
- Measure the string length. That is your run.
- Repeat across the yard. Slopes are rarely uniform, and the steepest section drives the cost.
Also note the fixed features a base map should carry: sun and shade, wind, utilities, hose bibs, downspouts, and where water goes in a storm. A measured base map with use zones, main paths, service access and mature plant spacing is the foundation of any good layout.
Zone the yard before you decorate it
Professional designers tend to give the same advice: settle the zoning first. That means deciding where the lawn ends and the terrace begins, where the seating goes, where the vegetables sit and how you reach each of them. The most common planning failure, according to garden layout guidance, is putting looks ahead of function, which leaves you with muddy shortcuts and hoses that can't reach.
On a slope, zoning also means working with gravity. A practical split looks like this:
| Zone | Best position on the slope | Why |
|---|---|---|
| Entertaining or seating | The flattest, most accessible level | Needs a stable, level surface and easy access from the house |
| Play or lawn | Lowest or widest flat platform | Flat area is hardest to create, so give it to the largest use |
| Vegetables and beds | Mid-slope, sunniest level | Terraced beds are easier to reach and hold water better |
| Planting for erosion control | Steepest faces | Roots hold soil where you can't build flat |
| Utility and service | Wherever machines or carts can reach | Compost, storage and water access shouldn't need a climb |
The same idea answers the common question about a garden zoning plan. Draw zones as simple shapes first, with no plants and no materials. Then check each one against three questions: can you get to it, can water leave it, and can you maintain it?
Think in levels, not in one tilted lawn
A foothills lot with 20 feet of elevation change can become three or four terraces, each one usable: a patio at the top, a garden in the middle and a play area at the bottom. That is a useful mental model even if you never build walls. Every level should have one clear job.
Terraces, banked borders or a mix
Most sloped yard designs come down to two strategies. Which one fits depends on grade, budget and how much flat ground you need.
Terracing
Terracing cuts a slope into a series of level steps held by retaining walls. It gives you real flat space for seating, play and growing food, and it is the most dramatic transformation. It is also the most expensive and the most dependent on good drainage and engineering.

Tiered walls load one another when they sit too close together, so tight tiers often need an engineer's input. If you are weighing this route, our guide to retaining wall design built around soil, drainage and 3D goes deeper on how to lay out the tiers.
Banked borders and planted slopes
If the grade is moderate, you can leave the ground sloped and plant it. Deep-rooted shrubs and groundcovers hold soil, and a few discreet steps or a path give access. Iowa State's extension service lists permanent erosion-control measures as important in the long term, alongside short-term protection while plants establish. In other words, plan for the first two seasons, when bare soil is most vulnerable.
This is also the cheaper route and the best fit for a low-maintenance yard. Our piece on low maintenance landscaping covers ranking ideas by effort and cost.
A mixed approach
Many good designs combine both: one or two shorter walls to create a flat patio or a vegetable level, with planted banks above and below. Shorter walls are cheaper per foot of height, easier to permit and kinder to the budget.
Retaining walls: height, shape and drainage
Keep walls short where you can
For walls under 4 feet, a tamped soil base roughly 12 to 18 inches deep is often sufficient. Beyond 4 feet, building codes commonly require an engineered concrete footing. Local rules vary, so check with your building department before you commit to height, especially if the wall sits near a property line, a driveway or a structure.
Curves look better and often behave better
Landscape guidance from the University of Nebraska says curved, sweeping lines tend to blend into a natural slope, while long straight walls may need columns or jogs to keep their integrity. A gently curving wall also looks less like a barrier and more like part of the garden.
Drainage is not optional
Trapped water builds hydrostatic pressure, which contractors name as the main cause of wall failure. The standard fix is gravel backfill plus a 4-inch perforated drain pipe behind the wall, daylighted downhill or tied into an existing system. The same source calls skipping drainage to save a few hundred dollars false economy, with rebuilds costing $3,000 to $10,000.
If you remember one rule from this guide, make it this one. Beautiful terraces with no drainage behind them are a countdown.
Don't forget where the soil goes
Cutting terraces moves a lot of earth. Decide early whether you will reuse it as fill on the lower levels or haul it away, because surplus soil is a real line item. If you are in Melbourne, Australia, this guide to soil disposal options and avoiding fines shows the kind of rules to check; US readers should ask their city or county about local fill and disposal rules.
Paths, steps and safe routes
Slopes force you to think about how people actually move. A few numbers from extension and design sources help:
- Path width: Kansas State's landscape design publication recommends paths at least 3 to 5 feet wide so two people can walk together or pass.
- Path cross-slope: On solid surfaces, a 1 to 2 percent grade keeps water from standing or puddling, according to the same publication.
- Step proportions: Garden design guidance suggests a 6-inch rise with the run plus twice the rise equal to 26 inches, which gives a 14-inch tread.
- Landings: The same source suggests a landing every 4 to 7 steps, so the climb never feels relentless.
- Edge protection: That article notes codes in the UK and various US jurisdictions commonly require a barrier for drops over about 2 feet (600 mm). Ask your local building department which rule applies to you.
A winding path with landings is not only safer, it is more pleasant, and it lets you carry a wheelbarrow without a fight. If the route will carry heavy loads, such as mulch or soil, plan one machine-friendly path from the start.
Planting a slope for roots, not only looks
Use the steep faces for plants that hold soil and the flat levels for the plants you want to touch and harvest. Two cautions from the sources:
- Map mature sizes. Crowding gives an instant full look, but Kansas State's guidance warns of disease and maintenance problems within a few years. Draw plants at their grown size, not their nursery size.
- Protect soil while it establishes. Bare ground on a slope washes out. Plan temporary cover and phase planting so the steepest areas go in first.
If you want vegetables, terraced levels suit raised beds well. Our raised bed layout templates and 4-foot garden bed layout show reachable dimensions you can repeat on each level. For watering a stepped yard, plan drip irrigation zones by level, since water pressure and runoff differ from top to bottom.
What a sloped yard costs
Slopes cost more than flat yards for a simple reason: the hard parts get harder. Here are the main drivers.
Wall costs
Professional retaining wall installation in 2025 typically ran $25 to $100 per square foot of wall face depending on material, excluding site prep, demolition and permits:
| Material | Typical range per sq ft | 30 ft long x 3 ft high (90 sq ft) |
|---|---|---|
| Segmental block | $25 to $35 | $2,250 to $3,150 |
| Boulder or stone | $40 to $80 | $3,600 to $7,200 |
| Poured concrete | $60 to $100 | $5,400 to $9,000 |
Prices differ by region. A contractor in the Lehigh Valley, for example, quotes $35 to $50 per square foot for complete installation, and says stair additions start at roughly $400. Treat all published figures as a range to test against local bids.
Access premiums
The same Utah contractor says restricted property access, such as a steep narrow side yard, can add a 20 to 40% premium, and 50 to 100% more when machines can't reach and materials must be hand-carried. If your slope is behind the house with no gate, ask every bidder how they plan to get materials in.
Why estimates drift
The wall that was 3 feet high on paper becomes 4 feet after you move a terrace. A path gets longer. Another level needs steps. Each change shifts the quantities, and a spreadsheet doesn't notice. This is where most sloped yard budgets quietly go wrong. For a deeper breakdown of wall pricing, see our retaining wall cost guide.
Our perspective
We built Veete because the most expensive mistakes in garden projects are rarely about taste. They are about numbers that fell out of sync: a wall that grew a foot while the budget stayed the same, a bed that moved while the shopping list didn't.
On a slope this happens constantly, because every decision is linked. Moving a terrace changes the wall length, the fill, the gravel, the steps and the planting area at once. That is why we tie pricing directly to the objects in the plan. When you stretch a wall, the quantity and cost update with it, using your own supplier rates, so you are not re-measuring and re-adding by hand.
Our advice for any sloped yard is the same: zone first, draw the hard structures second, and look at the cost before you fall in love with a layout. A plan that is beautiful but can't be priced tends to stall. A plan you can adjust in minutes, and watch the total move, tends to get built.
— Rokas
Plan and price your slope in 3D
If you want to test terraces, steps and walls before you buy materials, Veete lets you build the yard in your browser, with no installation. Beds, lawns, paving, fencing and structures carry live estimates, and every design change updates quantities and costs automatically. You can also set your own supplier prices, then export the plan and a shopping list.
There is a Free plan with no card required, which suits a single project. Home is €6 per month or €48 per year, and Pro is €19 per month or €168 per year. See the Veete plans or start planning at veete.app.

For a sketch on paper first, a browser-based garden layout planner with measured plans and exports can help you get dimensions down. And our guide to the first four steps of backyard landscape planning covers how to move from sketch to a sequenced build.
A step-by-step workflow for your slope
- Measure the grade in several places and record the steepest section.
- Draw the base map with sun, wind, utilities, downspouts and water flow.
- Set the zones and give each level a single job.
- Decide the structure: terraces, banks or a mix, and the shortest walls that do the job.
- Design drainage behind every wall and for every path before choosing finishes.
- Lay out paths and steps with proper width, landings and edge protection checked against local code.
- Place plants at mature size, steep faces first.
- Price the whole plan with access premiums, then adjust until the total is one you'll fund.
- Phase the build from the bottom up or top down depending on access, and stabilize bare soil as you go.
For drainage-led planning on the front of the house, our front yard landscaping plan uses the same drainage-first logic, and our sustainable landscape design checks cover water and soil habits that suit slopes.
FAQ
What is a good design for a sloped yard?
The most reliable approach is to zone first, then give each level one job. Use short terrace walls where you need flat space and planted banks where you don't. Add drainage behind every wall and a path that people and wheelbarrows can actually use.
How steep is too steep to handle myself?
Extension sources define steep as more than 20%, or 2 feet of drop for every 10 feet of run. Below that, many homeowners can plan beds, steps and low walls. Above it, or for any wall over about 4 feet, talk to a landscape professional or a licensed engineer and your local building department.
How do I landscape a hillside cheaply?
Avoid building walls where plants can do the job. Keep the grade, add a path with a few steps, and plant deep-rooted shrubs and groundcovers on the steep faces. Where you do need a wall, keep it short and build the drainage in properly, since a rebuild costs far more than the gravel and pipe.
Do I need a retaining wall on a sloped yard?
Not always. A gentle slope can be planted and stepped without any wall. You need one when you want flat usable space or the soil is already moving, and taller walls usually need a permit and engineered footings, so check your local rules first.
Sources
- Gardening on Steep Slopes, Mississippi State University Extension
- Meeting the landscape challenges of slopes and hillsides, UGA Extension Forsyth County
- Garden Layout Design: Plan A Functional, Beautiful Yard, Garden Insider
- Retaining Walls for Salt Lake City Yards, Simms Landscape
- G86-823 Rock Retaining Wall Construction, University of Nebraska
- Gardening on Slopes and Hillsides, Iowa State University
- MF2925 Landscape Design, Kansas State University
- How to design a garden on a slope, Gardens Illustrated
- How Much Does a Retaining Wall Cost in the Lehigh Valley?, Landview Services